How to Generate Seo for You Blogger Account or Blogspot.com
Earlier this week, Blogger announced what is probably the most awaited feature that made a friend of mine to move to WordPress late last year. WordPress has lots of SEO plugins and it was quite an edge over blogger as I mentioned on this post but this new feature addresses that to some extent. Blogger now has a SEO settings right in the dashboard and lots of blogspot users don’t even know how to go about this. With the whole thing done wrong, your blog can disappear from google search without you knowing it. It should be noted that you can’t toy around with these settings unless you know exactly what you’re doing. The following features can be found in the new SEO preferences:
- Description meta tag
- Custom 404 page
- Custom redirects (Redirect 404 pages to any page on your blog).
- Custom robots.txt
- Custom Robots header tags
- No follow tag, open link in new tab
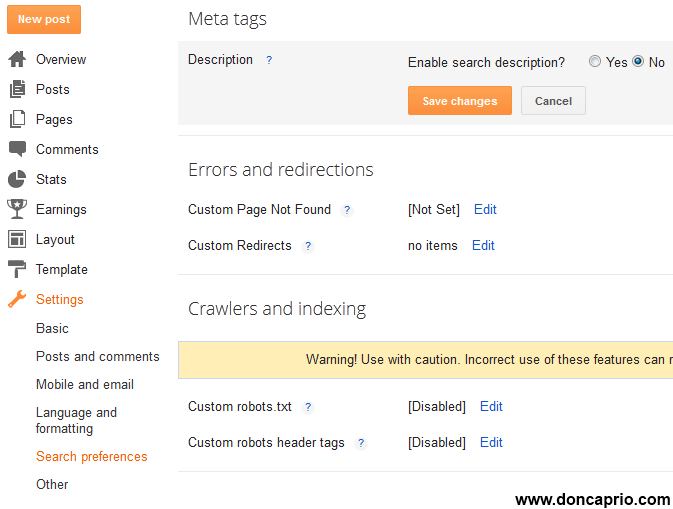
How to Activate Blogger Advanced SEO Settings As mentioned earlier, doing this the wrong way can remove your site from google search and I suggest you go through this post careful unless you know exactly what this SEO search preferences mean. To Enable them, go to Settings > Search Preferences
Now let’s take a look into these settings one after the other so as to know how to use them.
- Description Meta Tag
Description meta tag does only one thing: It gives potential visitors an overview of what your blog is all about on search engine result page (SERP).
As shown in the image below, that is exactly how meta description makes your site appears on google search.
 You should, however, keep two things in mind when writing your meta description:
 - It shouldn’t be more than 150 characters because this is what most search engines use and if it exceeds the limit, the rest may be cut off.
- For search engine optimization, you should include your most important keywords in the meta description.
- This is just for the homepage and not the entire blog, OK?
Meta Description for Individual Posts
In the past, you need to edit your template to use unique meta description for individual blog posts but it’s a lot different now. By activating meta description from your search preferences as explained above, you automatically get the option to add meta description to your blog posts from the post editor.
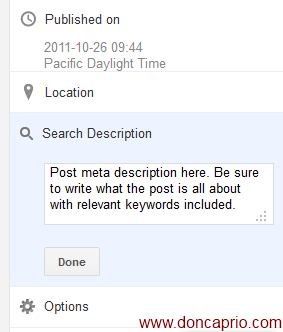 This description should also contain the most relevant keyword in the post and shouldn’t exceed 150 characters. I think the maximum limit is 160 though.
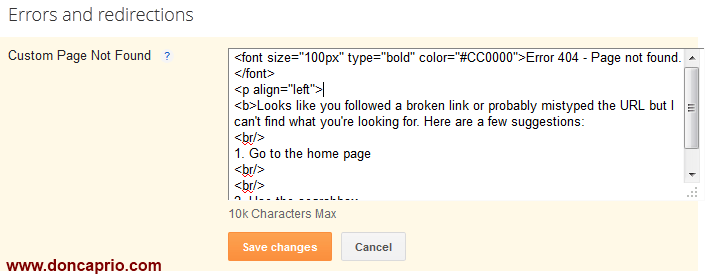
- Custom 404 Page This is useful when visitors land on a page that no longer exists, followed a broken link or mistyped a URL.
You can simply copy the code below and paste it in the appropriate box to set up your own Error 404page
<font size=”100px” type=”bold” color=”#CC0000″>Error 404 – Page not found.</font>
<p align=”left”>
Looks like you followed a broken link or probably mistyped the URL but I can’t find what you’re looking for. Here are a few suggestions:
- Go to the home page
- Use the searchbox </b></p>
3. Custom Redirects
If you’ve written an old post and wish to redirect to a newly updated one that’s more detailed, this comes in handy. It can also be used to correct some permalinks linked from other sites that were mistyped. You can detect these from Google Webmaster Tools.
 4. Custom Robots.txt
If you’re new to all these SEO terms, you may be wondering what robots.txt means. Robots.txt is just a simple text file place at the root of your domain that tells search engines how to index your site, where to crawl and where not to crawl. As you can see, using the wrong robots.txt can remove your index from google search which happens to be your largest source of traffic.
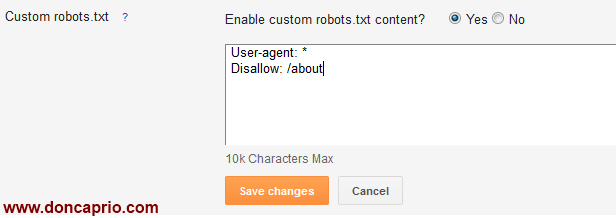 To exclude certain content from being searched, go to Settings > Search Preferences and click Edit next to “Custom robots.txt.” Enter the content which you would like web robots to ignore. For example:
User-agent: *
Disallow: /about
For a better understanding of what robots.txt does, you can watch this video by Matt Cutts. It gives you an insight in the basics.
You should only use this feature if you’re absolutely sure of what you’re doing. I suggest you should leave it the way it is unless you wish to remove certain pages from search results.
- Custom Robots header tags This is also used to control how search bots crawl and index your blog and should also be carefully used. Whatever settings you make here should be seen in your blog’s head section and will determine search engines behavior. It looks a lot complex but this table should explain what most of these terms mean:
DirectiveMeaningallThere are no restrictions for indexing or serving. Note: this
directive is the default value and has no effect if explicitly
listed.noindexDo not show this page in search results and
do not show a “Cached” l
ink in search results.nofollowDo not follow the links on this pagenoneEquivalent to noindex, nofollownoarchiveDo not show a “Cached” link in search results.nosnippetDo not show a snippet in the search results
for this pagenoodpDo not use metadata from the
Open Directory project for titles or
snippets shown for this page.notranslateDo not offer translation of this page in
search results.noimageindexDo not index images on this page.unavailable_after: [RFC-850 date/time]Do not show this
page in search results after the specified date/time. The date/time
must be specified in the
RFC 850 format.
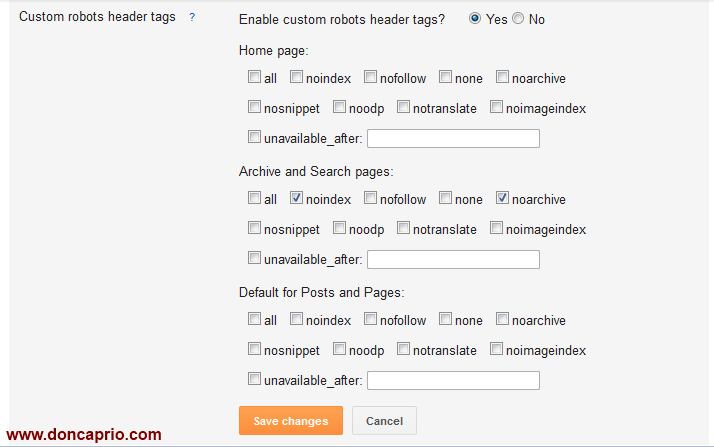
To avoid duplicate contents which can get your blog penalized by google, I suggest you keep your search and label pages from google’s index as shown in the image below:
 You can take advantage of this feature to make your site rank higher on SERP. If you found this blog post helpful you can also visit click her and hit the Google+ button
CREDITS TO DN. CAPRIO @ http://doncaprio.com
Continue Reading
What does the next era of leverage look like?
From Columbus to AI - how leverage has evolved through geography, infrastructure, code, attention, and now intelligen...

My Claude Codes Better than Yours
In AI native workplaces, the tension is no longer who writes better code. It's who extracts better intelligence. When...
The Side Effect of Vibe Coding Nobody Talks About
A subtle shift from AI coding: reading code faster, and why tiny diffs suddenly feel like a slowdown worth unpacking.

